Defend Our Marines / September 15, 2007
The Real Story of Haditha: Never-before-revealed images from a surveillance video
Part one: The ambush site: 0759
Part two: Insurgents regroup: 0814 – 0910
Part three: The last battle: 0913 – 1544
© Nathaniel R. Helms 2007
You’re seeing here it first.
These images are from a video, obtained by Defend Our Marines, that was recorded by a Scan Eagle orbiting the ambush site at Haditha on November 19, 2005. The video runs 43-minutes and is a presentation culled from more than eight hours of continuous footage.
They have never before been seen by the public.
The images are presented in chronological order using the time/date stamps created by the Scan Eye recording system as the video was being made.
The video we obtained was prepared for the upcoming Article 32 hearing of Captain Lucas McConnell, formerly the company commander of Kilo Co., 3rd Battalion, 1st Marines at Haditha in 2005. McConnell was relieved of command in April, 2006 for alleged dereliction of duty following allegations of murder by members of his infantry company during the day-long battle in Haditha that left 24 Iraqis and one Marine dead, and 11 Marines wounded.
This presentation is intended to refute allegations made in Time magazine and other media outlets which claimed the Marines massacred the Iraqi civilians in a fit of rage following the death of LCpl Miguel ‘T.J.’ Terrazas, one of Kilo Company’s Marines. The cable television network CNN also obtained a copy of this video presentation but for reason best known to its producers elected to disregard most of the exculpatory images contained in it.
NOTE: Video images with enhancement boxes were altered by selecting the area and brightening it with a Photoshop tool for clarity.
The rectangular white box on each image is the camera target area, designated by the Scan Eagle operator.]
____________________________________________________
The last battle
Images recorded by the Scan Eagle at Haditha: 0913 to 1544 / November 19, 2005
____________________________________________________

0913 Scan Eagle tracks motorcycle courier until he meets up with the blue car that Cpl. Haman referred to in his account of the battle. Then the Scan Eagle begins surveillance of the blue car. The blue car cruises the palm grove, meeting up with several vehicles that enter and exit on Palm Grove Trail. Both vehicles linked up repeatedly with insurgents to exchange weapons and intelligence, according to the Marines who wrote the report. Eventually the blue car moves south and out of the palm grove toward the ‘safe house.’ Along the way the blue car stops several times to hold conversations with unidentified Iraqis.
0913 to 0928 – Blue car and motorcycle leave palm grove heading southwest toward safe so-called house what is west of ambush site. The blue car travels about 2 kilometers during the trip. Intelligence assets had warned Marines of alleged safe house in previous meetings.

Blue car meets up with taxi full of insurgents stopping and possibly linking up with other possible insurgent vehicles as they head south along Palm grove trail. Euphrates River is on east (right) side of image as the blue car travels south.

Blue car meets up with another vehicle where brief conversation takes place. Blue car is still heading south toward safe house.

Blue car arrives at safe house at intersection of Palm Grove Trail and River Road, about 700 meters from Route Chestnut and Viper. At this moment Cpl. Haman’s squad is moving toward safe house in tactical formation. His squad is about 600 meters from the blue car out of the frame coming toward it from the upper left.

Blue car is now parked out of sight of the road. Suspected safe house is outlined in red at upper left. Another insurgent suspect is walking toward the house at the time.

Blue car is now backed all the way behind the suspected safe house drive way, putting it out of sight of Marines closing in on the building. Unknown to the approaching Marines there are already five to eight insurgents hiding inside the building with a huge arsenal of weapons.

0940 Scan Eagle observes two more males enter safe house.
____________________________________________________

Larger image below, click to enlarge…

0944 Scan Eagle observes first Hellfire missile attack from orbiting USMC Cobra attack helicopter. Cpl. Haman’s 4th Plt has now cordoned off the building and is out of site around the periphery of compound.
____________________________________________________

0949 Second Hellfire missile strikes safe house. SSgt. Wuterich’s squad is about 600 meters north of this building. 4th Squad has it surrounded.
From SSgt. Frank Wuterich’s statement at his Article 32 hearing:
‘We watched as rotary winged aircraft deployed Hellfires and dropped bombs on houses directly to our south. We remained on overwatch for the majority of the rest of the day.’
The battle has been developing for more than two hours.
____________________________________________________

Larger image below, click to enlarge…

0945 to 1000 4th Platoon Marines move in to assess Hellfire damage. At this point there is still no return fire from insurgents. This is probably Haman’s fire team crossing the road. Safe house is in lower left side of image.
____________________________________________________

Larger image below, click to enlarge…

0945 to 1000 4th Platoon Marines continue moving in at a run to assess Hellfire damage, unfortunately they head to the wrong house. There is still no return fire coming from safe house.
____________________________________________________

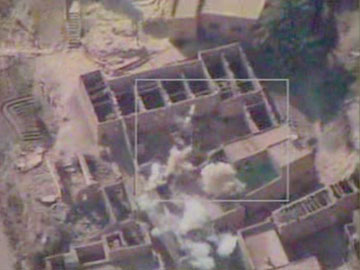
0945 to 1000 Smoke caused by the explosion of Cpl. Hamen’s grenade when 4th Platoon attacked the wrong house. Blue car is directly behind smoke plume.
____________________________________________________

Larger image below, click to enlarge…

1014 – Two insurgents appear on roof and begin throwing grenades at 4th Squad members. Smoke on left is probably the grenade explosion that wounded Lt. Zall and the Navy corpsman. Cpl. Haman’s fire
team is in the building directly above and adjacent to where insurgents are hiding on the roof. Moments before this frame was recorded his fire team got into a grenade exchange inside that house.
____________________________________________________

Larger image below, click to enlarge…

1018 Insurgents move to the roof top and engage in firefight with Marines below. Midway through the fight one insurgent, seen in middle of roof lying sideways was killed by small arms fire from the attacking Marines. The dead insurgent and his weapon remain on the roof until the building is bombed by Marine Corps F-18 attack jets.
____________________________________________________

1019 – One insurgent lies dead with his weapon next to him (square) and another continues to move around the roof firing at the Marines despite heavy return fire (circle).
____________________________________________________

1029 4th Squad suppresses rooftop fighters with heavy automatic weapons and M-203 grenade fire.
____________________________________________________

1029 4th Platoon suppresses insurgents in safe house with automatic weapons fire as wounded, non-ambulatory Marines are carried to safety to a waiting gun truck.
____________________________________________________

1031 4th Plt Leader Lt Zall and other wounded Marines and a Navy corpsman are loaded into gun truck for evacuation to Battalion Aid Station.
____________________________________________________

Larger image below, click to enlarge…

1033 – Insurgent preparing to jump off roof under heavy fire prior to Marine F-18 attack jets beginning their bomb runs.
____________________________________________________
Larger image below, click to enlarge…

1034 – Cobra helicopter gunship sprays rooftop with 20mm cannon fire as two more insurgents jump off roof at top of structure.
____________________________________________________

1044 – LCpl Pegues marks insurgent targets on roof with green smoke to identify their position prior to air strikes by orbiting USMC F-18 attack fighters.
____________________________________________________

1314 After a dud bomb fails to dislodge insurgents at 1059 Marines surround building and keep it cordoned off for more than two hours until another flight of F- 18s arrives to bomb the structure. This is picture of first 500-pound bomb hitting house.
____________________________________________________

1314 Second bomb hits target but fails to explode. Remnants of bomb can be seen hurtling through the air inside circle.
____________________________________________________

1329 Third 500-pound bomb explodes, literally flattening building. Later five insurgents and a large cache of weapons were recovered among the debris. At least two insurgents were seen fleeing from the building after the bomb blast.
____________________________________________________

1429 Fleeing insurgent is tracked from house to house west of the safe house to a residence where Capt. McConnell with a squad from 3rd Plt., a squad from 4th Plt., a section of M1 tanks, and a squad of Iraqi soldiers detain him without a fight.
____________________________________________________

1514 – A section of M1 tanks (one in square) and a squad of Iraqi soldiers close in on insurgent and capture him without resistence.
____________________________________________________

1544 Insurgent, now zip tied and in custody of Iraqi soldiers, is led away for interrogation.
This was the last recorded action in the fight that lasted from 0715 to 1544, more than 8 hours.
____________________________________________________
Nathaniel R. Helms
Defend Our Marines September 2007
Note: Nat Helms is a Contributing Editor to Defend Our Marines. He is a Vietnam vet, journalist, combat reporter, and, most recently, author of My Men Are My Heroes: The Brad Kasal Story (Meredith Books, 2007).